1. Memasang Peralatan seperti Gambar di Bawah Ini :
 2. Memberi Nama Hostname pada Masing-masing Router :
Router>ena
Router#conf t
Router(config)#hostname R1
Router>ena
Router#conf t
Enter configuration commands, one per line. End with CNTL/Z.
Router(config)#hostname R2
Router>ena
Router#conf t
Enter configuration commands, one per line. End with CNTL/Z.
Router(config)#hostname R3
3. Memasukkan IP Address pada Masing-masing Interface :
R1(config)#int fa0/0
R1(config-if)#ip add 172.16.3.1 255.255.255.0
R1(config-if)#no shut
R1(config-if)#exit
R1(config)#int s0/0/0
R1(config-if)#ip add 172.16.2.1 255.255.255.0
R1(config-if)#clock rate 64000
R1(config-if)#no shut
R1(config-if)#exit
R2(config)#int fa0/0
R2(config-if)#ip add 172.16.1.1 255.255.255.0
R2(config-if)#no shut
R2(config-if)#exit
R2(config)#int s0/0/0
R2(config-if)#ip add 172.16.2.2 255.255.255.0
R2(config-if)#no shut
R2(config-if)#exit
R2(config)#int s0/0/1
R2(config-if)#ip add 192.168.1.2 255.255.255.0
R2(config-if)#clock rate 64000
R2(config-if)#no shut
R2(config-if)#exit
R3(config)#int fa0/0
R3 (config-if)#ip add 192.168.2.1 255.255.255.0
R3 (config-if)#no shut
R3 (config-if)#exit
R3 (config)#int s0/0/1
R3 (config-if)#ip add 192.168.1.1 255.255.255.0
R3 (config-if)#no shut
4. Mengenalkan Masing-masing Jaringan dengan Menggunakan Router Statis :
R1(config)#ip route 172.16.1.0 255.255.255.0 172.16.2.2
R1(config)#ip route 192.168.0.0 255.255.252.0 172.16.2.2
R1(config)#end
R2(config)#ip route 172.16.3.0 255.255.255.0 172.16.2.1
R2(config)#ip route 192.168.2.0 255.255.255.0 192.168.1.1
R2(config)#end
R3 (config)#ip route 172.16.0.0 255.255.252.0 192.168.1.2
R3 (config)#end
5. Memasukkan IP Address pada Masing-masing PC :
PC1
PC2
PC3
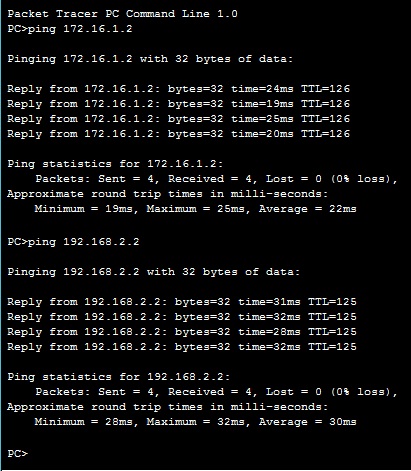
6. Memeriksa Koneksi dengan Perintah ping pada Masing-masing PC :
PC1
Lakukan hal yang sama pada PC2 dan PC3
7. Memeriksa Koneksi dengan Perintah traceroute :
R1#traceroute 192.168.1.0
Type escape sequence to abort.
Tracing the route to 192.168.1.0
1 172.16.2.2 2 msec 5 msec 7 msec
R1#traceroute 192.168.2.0
Type escape sequence to abort.
Tracing the route to 192.168.2.0
1 172.16.2.2 7 msec 7 msec 5 msec
2 192.168.1.1 9 msec 8 msec 10 msec
R1#traceroute 172.16.2.0
Type escape sequence to abort.
Tracing the route to 172.16.2.0
1 172.16.2.2 3 msec 5 msec 5 msec
R1#traceroute 172.16.1.0
Type escape sequence to abort.
Tracing the route to 172.16.1.0
1 172.16.2.2 7 msec 6 msec 2 msec
R2#traceroute 172.16.3.0
Type escape sequence to abort.
Tracing the route to 172.16.3.0
1 172.16.2.1 6 msec 4 msec 8 msec
R2#traceroute 192.168.2.0
Type escape sequence to abort.
Tracing the route to 192.168.2.0
1 192.168.1.1 4 msec 5 msec 6 msec
R3#traceroute 172.16.1.0
Type escape sequence to abort.
Tracing the route to 172.16.1.0
1 192.168.1.2 8 msec 4 msec 6 msec
R3#traceroute 172.16.2.0
Type escape sequence to abort.
Tracing the route to 172.16.2.0
1 192.168.1.2 4 msec 4 msec 5 msec
R3#traceroute 172.16.3.0
Type escape sequence to abort.
Tracing the route to 172.16.3.0
1 192.168.1.2 8 msec 8 msec 5 msec
2 172.16.2.1 11 msec 10 msec 13 msec
8. Memeriksa Koneksi dengan Menggunakan Perintah show ip route :
R1#sh ip route
Codes: C - connected, S - static, I - IGRP, R - RIP, M - mobile, B - BGP
D - EIGRP, EX - EIGRP external, O - OSPF, IA - OSPF inter area
N1 - OSPF NSSA external type 1, N2 - OSPF NSSA external type 2
E1 - OSPF external type 1, E2 - OSPF external type 2, E - EGP
i - IS-IS, L1 - IS-IS level-1, L2 - IS-IS level-2, ia - IS-IS inter area
* - candidate default, U - per-user static route, o - ODR
P - periodic downloaded static route
Gateway of last resort is not set
172.16.0.0/24 is subnetted, 3 subnets
S 172.16.1.0 [1/0] via 172.16.2.2
C 172.16.2.0 is directly connected, Serial0/0/0
C 172.16.3.0 is directly connected, FastEthernet0/0
S 192.168.0.0/22 [1/0] via 172.16.2.2
R2#sh ip route
Codes: C - connected, S - static, I - IGRP, R - RIP, M - mobile, B - BGP
D - EIGRP, EX - EIGRP external, O - OSPF, IA - OSPF inter area
N1 - OSPF NSSA external type 1, N2 - OSPF NSSA external type 2
E1 - OSPF external type 1, E2 - OSPF external type 2, E - EGP
i - IS-IS, L1 - IS-IS level-1, L2 - IS-IS level-2, ia - IS-IS inter area
* - candidate default, U - per-user static route, o - ODR
P - periodic downloaded static route
Gateway of last resort is not set
172.16.0.0/24 is subnetted, 3 subnets
C 172.16.1.0 is directly connected, FastEthernet0/0
C 172.16.2.0 is directly connected, Serial0/0/0
S 172.16.3.0 [1/0] via 172.16.2.1
C 192.168.1.0/24 is directly connected, Serial0/0/1
S 192.168.2.0/24 [1/0] via 192.168.1.1
R3#sh ip route
Codes: C - connected, S - static, I - IGRP, R - RIP, M - mobile, B - BGP
D - EIGRP, EX - EIGRP external, O - OSPF, IA - OSPF inter area
N1 - OSPF NSSA external type 1, N2 - OSPF NSSA external type 2
E1 - OSPF external type 1, E2 - OSPF external type 2, E - EGP
i - IS-IS, L1 - IS-IS level-1, L2 - IS-IS level-2, ia - IS-IS inter area
* - candidate default, U - per-user static route, o - ODR
P - periodic downloaded static route
Gateway of last resort is not set
172.16.0.0/22 is subnetted, 1 subnets
S 172.16.0.0 [1/0] via 192.168.1.2
C 192.168.1.0/24 is directly connected, Serial0/0/1
C 192.168.2.0/24 is directly connected, FastEthernet0/0
9. Memeriksa Koneksi dengan Menggunakan Perintah show ip interface brief :
R1#sh ip int br
Interface IP-Address OK? Method Status Protocol
FastEthernet0/0 172.16.3.1 YES manual up up
FastEthernet0/1 unassigned YES manual administratively down down
Serial0/0/0 172.16.2.1 YES manual up up
Serial0/0/1 unassigned YES manual administratively down down
Vlan1 unassigned YES manual administratively down down
R2#sh ip int br
Interface IP-Address OK? Method Status Protocol
FastEthernet0/0 172.16.1.1 YES manual up up
FastEthernet0/1 unassigned YES manual administratively down down
Serial0/0/0 172.16.2.2 YES manual up up
Serial0/0/1 192.168.1.2 YES manual up up
Vlan1 unassigned YES manual administratively down down
R3#sh ip int br
Interface IP-Address OK? Method Status Protocol
FastEthernet0/0 192.168.2.1 YES manual up up
FastEthernet0/1 unassigned YES manual administratively down down
Serial0/0/0 unassigned YES manual administratively down down
Serial0/0/1 192.168.1.1 YES manual up up
Vlan1 unassigned YES manual administratively down down
10. Memeriksa Koneksi dengan Menggunakan Perintah show cdp neighbors detail :
R1#sh cdp neighbors detail
Device ID: Switch
Entry address(es):
Platform: cisco 2960, Capabilities: Switch
Interface: FastEthernet0/0, Port ID (outgoing port): FastEthernet0/1
Holdtime: 171
Version :
Cisco IOS Software, C2960 Software (C2960-LANBASE-M), Version 12.2(25)FX, RELEASE SOFTWARE (fc1)
Copyright (c) 1986-2005 by Cisco Systems, Inc.
Compiled Wed 12-Oct-05 22:05 by pt_team
advertisement version: 2
Duplex: full
---------------------------
Device ID: R2
Entry address(es):
IP address : 172.16.2.2
Platform: cisco C1841, Capabilities: Router
Interface: Serial0/0/0, Port ID (outgoing port): Serial0/0/0
Holdtime: 152
Version :
Cisco IOS Software, 1841 Software (C1841-ADVIPSERVICESK9-M), Version 12.4(15)T1, RELEASE SOFTWARE (fc2)
Technical Support: http://www.cisco.com/techsupport
Copyright (c) 1986-2007 by Cisco Systems, Inc.
Compiled Wed 18-Jul-07 04:52 by pt_team
advertisement version: 2
Duplex: full
R2#sh cdp neighbors detail
Device ID: Switch
Entry address(es):
Platform: cisco 2960, Capabilities: Switch
Interface: FastEthernet0/0, Port ID (outgoing port): FastEthernet0/1
Holdtime: 156
Version :
Cisco IOS Software, C2960 Software (C2960-LANBASE-M), Version 12.2(25)FX, RELEASE SOFTWARE (fc1)
Copyright (c) 1986-2005 by Cisco Systems, Inc.
Compiled Wed 12-Oct-05 22:05 by pt_team
advertisement version: 2
Duplex: full
---------------------------
Device ID: R1
Entry address(es):
IP address : 172.16.2.1
Platform: cisco C1841, Capabilities: Router
Interface: Serial0/0/0, Port ID (outgoing port): Serial0/0/0
Holdtime: 179
Version :
Cisco IOS Software, 1841 Software (C1841-ADVIPSERVICESK9-M), Version 12.4(15)T1, RELEASE SOFTWARE (fc2)
Technical Support: http://www.cisco.com/techsupport
Copyright (c) 1986-2007 by Cisco Systems, Inc.
Compiled Wed 18-Jul-07 04:52 by pt_team
advertisement version: 2
Duplex: full
---------------------------
Device ID: R3
Entry address(es):
IP address : 192.168.1.1
Platform: cisco C1841, Capabilities: Router
Interface: Serial0/0/1, Port ID (outgoing port): Serial0/0/1
Holdtime: 128
Version :
Cisco IOS Software, 1841 Software (C1841-ADVIPSERVICESK9-M), Version 12.4(15)T1, RELEASE SOFTWARE (fc2)
Technical Support: http://www.cisco.com/techsupport
Copyright (c) 1986-2007 by Cisco Systems, Inc.
Compiled Wed 18-Jul-07 04:52 by pt_team
advertisement version: 2
Duplex: full
R3#sh cdp neighbors detail
Device ID: Switch
Entry address(es):
Platform: cisco 2960, Capabilities: Switch
Interface: FastEthernet0/0, Port ID (outgoing port): FastEthernet0/1
Holdtime: 148
Version :
Cisco IOS Software, C2960 Software (C2960-LANBASE-M), Version 12.2(25)FX, RELEASE SOFTWARE (fc1)
Copyright (c) 1986-2005 by Cisco Systems, Inc.
Compiled Wed 12-Oct-05 22:05 by pt_team

Router#conf t
Router(config)#hostname R1
Router>ena
Router#conf t
Enter configuration commands, one per line. End with CNTL/Z.
Router(config)#hostname R2
Router>ena
Router#conf t
Enter configuration commands, one per line. End with CNTL/Z.
Router(config)#hostname R3
3. Memasukkan IP Address pada Masing-masing Interface :
R1(config-if)#ip add 172.16.3.1 255.255.255.0
R1(config-if)#no shut
R1(config-if)#exit
R1(config)#int s0/0/0
R1(config-if)#ip add 172.16.2.1 255.255.255.0
R1(config-if)#clock rate 64000
R1(config-if)#no shut
R1(config-if)#exit
R2(config)#int fa0/0
R2(config-if)#ip add 172.16.1.1 255.255.255.0
R2(config-if)#no shut
R2(config-if)#exit
R2(config)#int s0/0/0
R2(config-if)#ip add 172.16.2.2 255.255.255.0
R2(config-if)#no shut
R2(config-if)#exit
R2(config)#int s0/0/1
R2(config-if)#ip add 192.168.1.2 255.255.255.0
R2(config-if)#clock rate 64000
R2(config-if)#no shut
R2(config-if)#exit
R3(config)#int fa0/0
R3 (config-if)#ip add 192.168.2.1 255.255.255.0
R3 (config-if)#no shut
R3 (config-if)#exit
R3 (config)#int s0/0/1
R3 (config-if)#ip add 192.168.1.1 255.255.255.0
R3 (config-if)#no shut
4. Mengenalkan Masing-masing Jaringan dengan Menggunakan Router Statis :
R1(config)#ip route 192.168.0.0 255.255.252.0 172.16.2.2
R1(config)#end
R2(config)#ip route 172.16.3.0 255.255.255.0 172.16.2.1
R2(config)#ip route 192.168.2.0 255.255.255.0 192.168.1.1
R2(config)#end
R3 (config)#ip route 172.16.0.0 255.255.252.0 192.168.1.2
R3 (config)#end
5. Memasukkan IP Address pada Masing-masing PC :

PC2

PC3

6. Memeriksa Koneksi dengan Perintah ping pada Masing-masing PC :
Lakukan hal yang sama pada PC2 dan PC3
7. Memeriksa Koneksi dengan Perintah traceroute :
Type escape sequence to abort.
Tracing the route to 192.168.1.0
1 172.16.2.2 2 msec 5 msec 7 msec
Type escape sequence to abort.
Tracing the route to 192.168.2.0
1 172.16.2.2 7 msec 7 msec 5 msec
2 192.168.1.1 9 msec 8 msec 10 msec
Type escape sequence to abort.
Tracing the route to 172.16.2.0
1 172.16.2.2 3 msec 5 msec 5 msec
Type escape sequence to abort.
Tracing the route to 172.16.1.0
1 172.16.2.2 7 msec 6 msec 2 msec
R2#traceroute 172.16.3.0
Type escape sequence to abort.
Tracing the route to 172.16.3.0
1 172.16.2.1 6 msec 4 msec 8 msec
Type escape sequence to abort.
Tracing the route to 192.168.2.0
1 192.168.1.1 4 msec 5 msec 6 msec
R3#traceroute 172.16.1.0
Type escape sequence to abort.
Tracing the route to 172.16.1.0
1 192.168.1.2 8 msec 4 msec 6 msec
Type escape sequence to abort.
Tracing the route to 172.16.2.0
1 192.168.1.2 4 msec 4 msec 5 msec
Type escape sequence to abort.
Tracing the route to 172.16.3.0
1 192.168.1.2 8 msec 8 msec 5 msec
2 172.16.2.1 11 msec 10 msec 13 msec
8. Memeriksa Koneksi dengan Menggunakan Perintah show ip route :
Codes: C - connected, S - static, I - IGRP, R - RIP, M - mobile, B - BGP
D - EIGRP, EX - EIGRP external, O - OSPF, IA - OSPF inter area
N1 - OSPF NSSA external type 1, N2 - OSPF NSSA external type 2
E1 - OSPF external type 1, E2 - OSPF external type 2, E - EGP
i - IS-IS, L1 - IS-IS level-1, L2 - IS-IS level-2, ia - IS-IS inter area
* - candidate default, U - per-user static route, o - ODR
P - periodic downloaded static route
Gateway of last resort is not set
172.16.0.0/24 is subnetted, 3 subnets
S 172.16.1.0 [1/0] via 172.16.2.2
C 172.16.2.0 is directly connected, Serial0/0/0
C 172.16.3.0 is directly connected, FastEthernet0/0
S 192.168.0.0/22 [1/0] via 172.16.2.2
R2#sh ip route
Codes: C - connected, S - static, I - IGRP, R - RIP, M - mobile, B - BGP
D - EIGRP, EX - EIGRP external, O - OSPF, IA - OSPF inter area
N1 - OSPF NSSA external type 1, N2 - OSPF NSSA external type 2
E1 - OSPF external type 1, E2 - OSPF external type 2, E - EGP
i - IS-IS, L1 - IS-IS level-1, L2 - IS-IS level-2, ia - IS-IS inter area
* - candidate default, U - per-user static route, o - ODR
P - periodic downloaded static route
Gateway of last resort is not set
172.16.0.0/24 is subnetted, 3 subnets
C 172.16.1.0 is directly connected, FastEthernet0/0
C 172.16.2.0 is directly connected, Serial0/0/0
S 172.16.3.0 [1/0] via 172.16.2.1
C 192.168.1.0/24 is directly connected, Serial0/0/1
S 192.168.2.0/24 [1/0] via 192.168.1.1
R3#sh ip route
Codes: C - connected, S - static, I - IGRP, R - RIP, M - mobile, B - BGP
D - EIGRP, EX - EIGRP external, O - OSPF, IA - OSPF inter area
N1 - OSPF NSSA external type 1, N2 - OSPF NSSA external type 2
E1 - OSPF external type 1, E2 - OSPF external type 2, E - EGP
i - IS-IS, L1 - IS-IS level-1, L2 - IS-IS level-2, ia - IS-IS inter area
* - candidate default, U - per-user static route, o - ODR
P - periodic downloaded static route
Gateway of last resort is not set
172.16.0.0/22 is subnetted, 1 subnets
S 172.16.0.0 [1/0] via 192.168.1.2
C 192.168.1.0/24 is directly connected, Serial0/0/1
C 192.168.2.0/24 is directly connected, FastEthernet0/0
9. Memeriksa Koneksi dengan Menggunakan Perintah show ip interface brief :
R1#sh ip int br
Interface IP-Address OK? Method Status Protocol
FastEthernet0/0 172.16.3.1 YES manual up up
FastEthernet0/1 unassigned YES manual administratively down down
Serial0/0/0 172.16.2.1 YES manual up up
Serial0/0/1 unassigned YES manual administratively down down
Vlan1 unassigned YES manual administratively down down
R2#sh ip int br
Interface IP-Address OK? Method Status Protocol
FastEthernet0/0 172.16.1.1 YES manual up up
FastEthernet0/1 unassigned YES manual administratively down down
Serial0/0/0 172.16.2.2 YES manual up up
Serial0/0/1 192.168.1.2 YES manual up up
Vlan1 unassigned YES manual administratively down down
R3#sh ip int br
Interface IP-Address OK? Method Status Protocol
FastEthernet0/0 192.168.2.1 YES manual up up
FastEthernet0/1 unassigned YES manual administratively down down
Serial0/0/0 unassigned YES manual administratively down down
Serial0/0/1 192.168.1.1 YES manual up up
Vlan1 unassigned YES manual administratively down down
10. Memeriksa Koneksi dengan Menggunakan Perintah show cdp neighbors detail :


